
My final project before retiring as the Yale Peabody Museum’s preparator has been to create a new model of the dodo for display in the renovated museum.

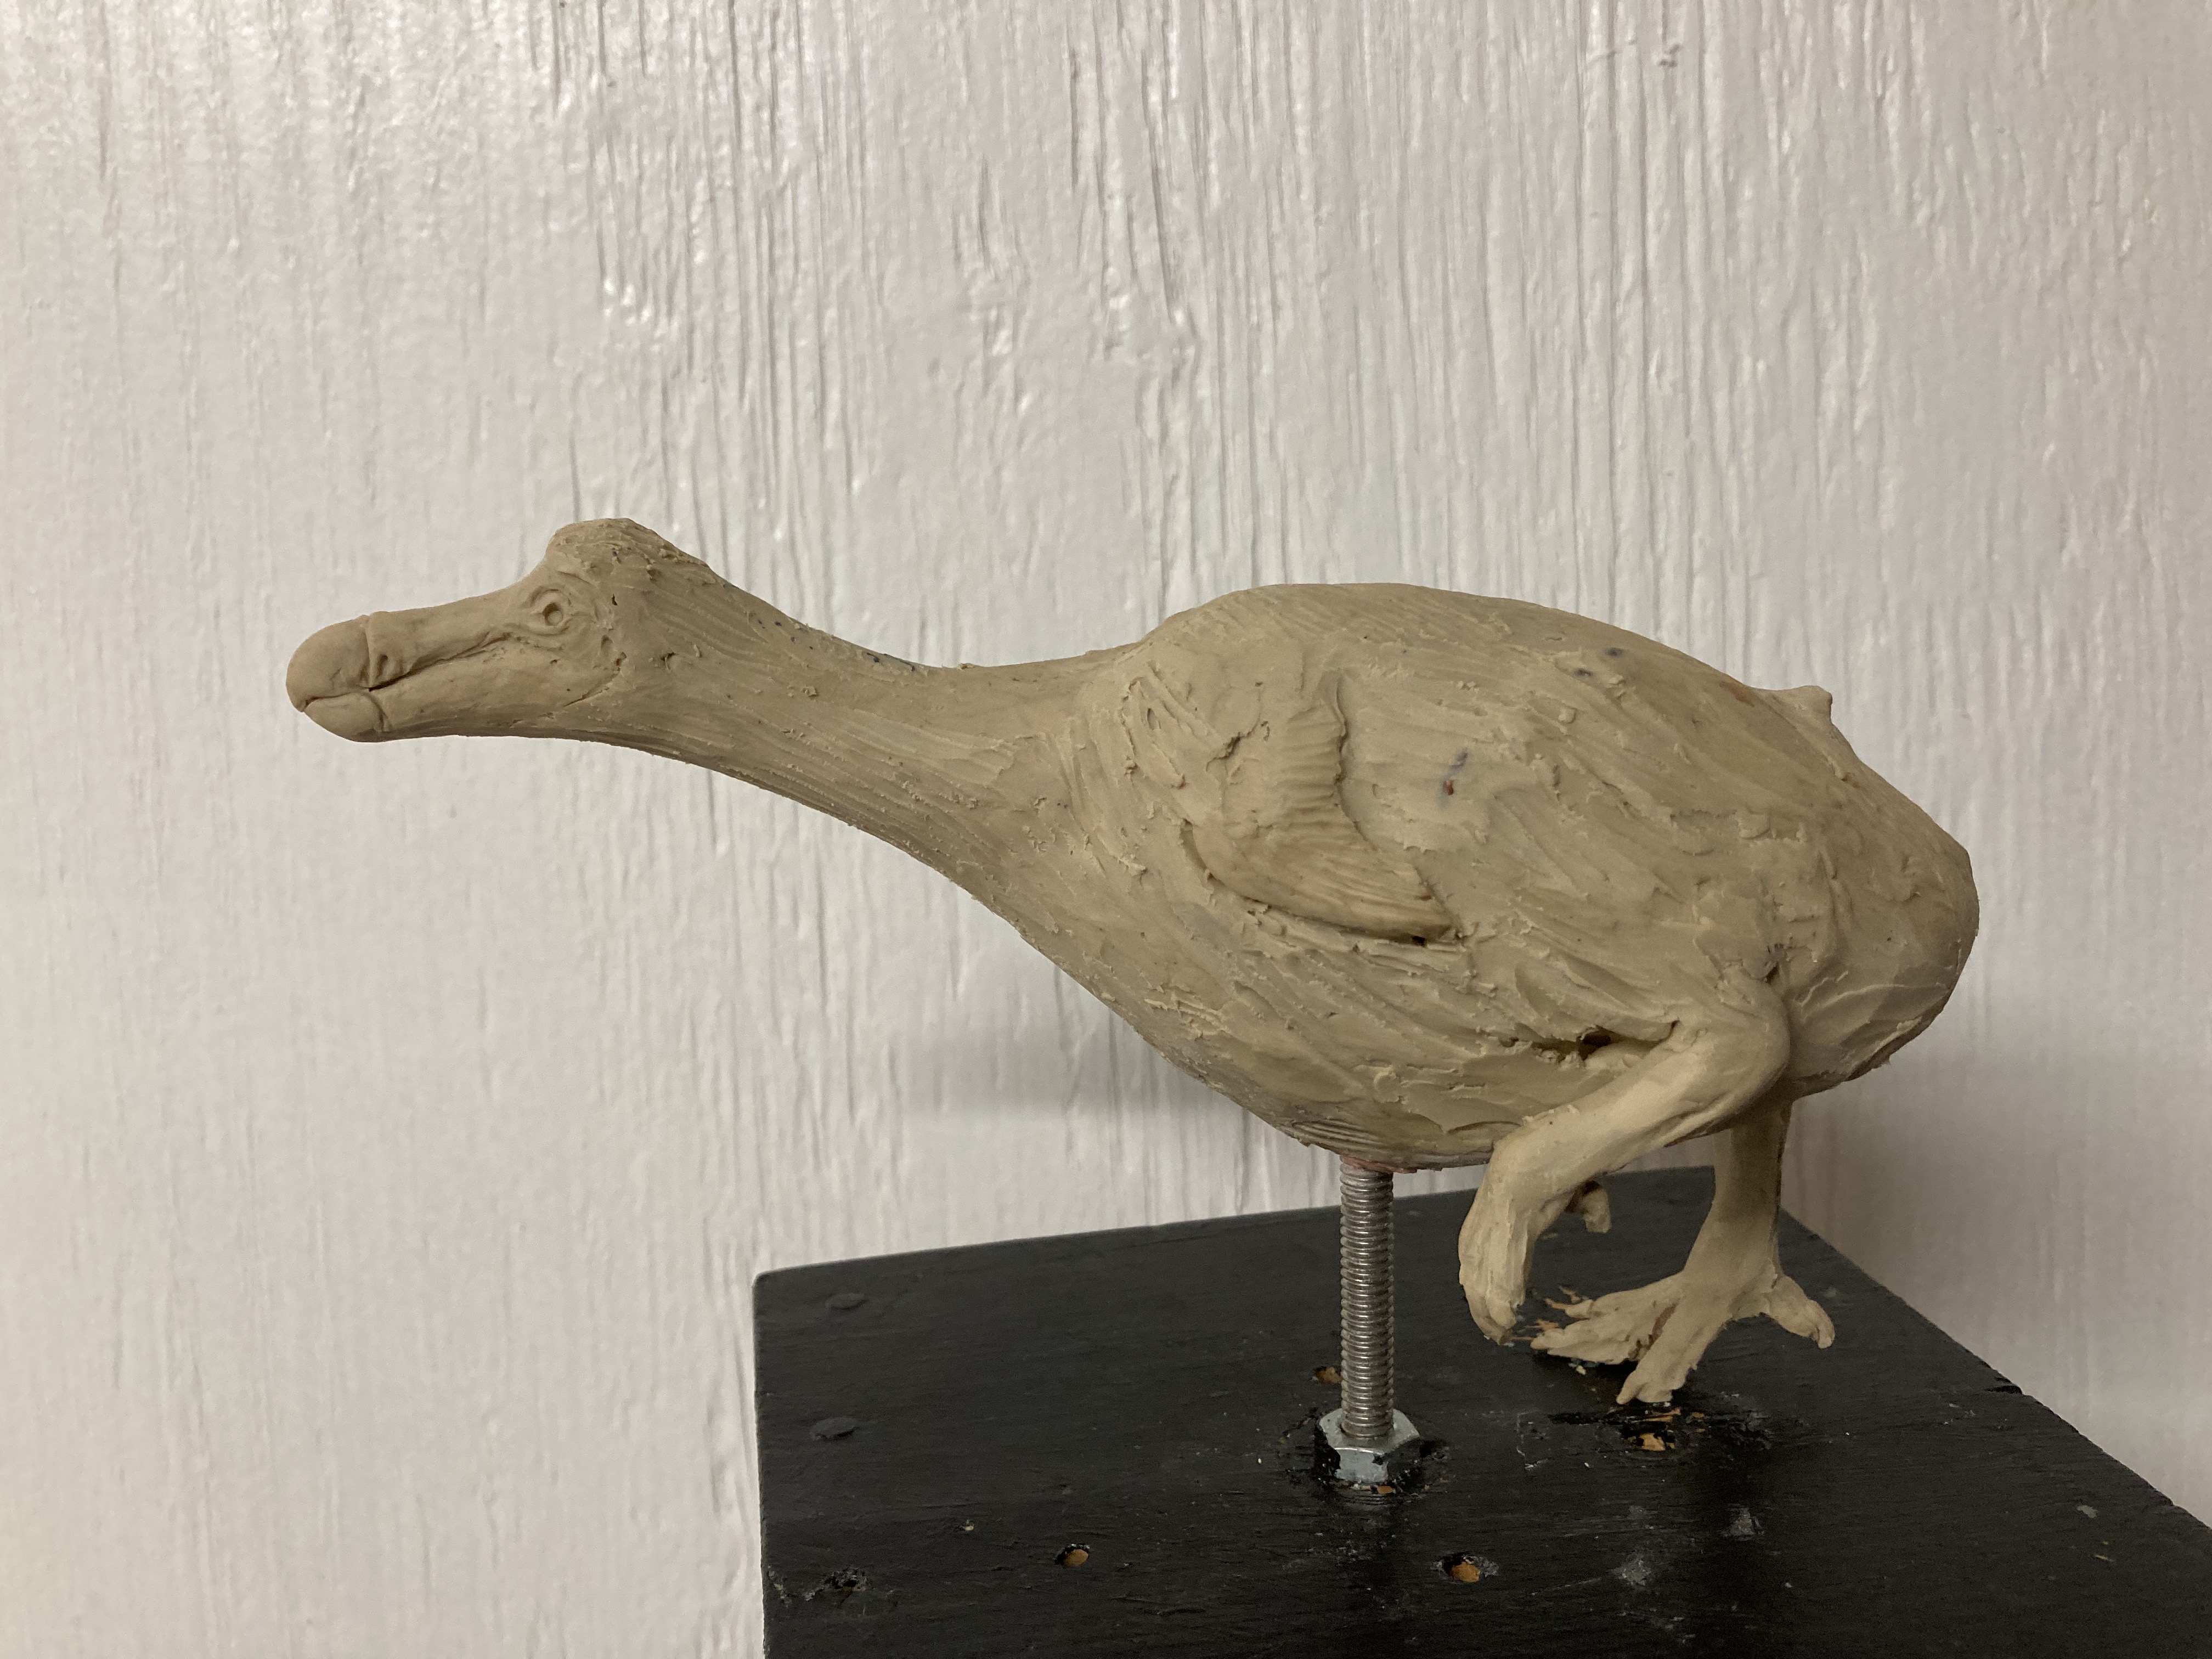
The dodo exhibit was beloved by visitors. While working in the galleries, I often saw group after group of kids run through the Connecticut Bird Hall to point and laugh at this model. Little did they know that Peabody ornithologists had no better opinion of it than they did. Recent research on two almost complete skeletons, in South Africa and Mauritius, has changed the thinking about what this bird might have looked like. Traditionally depicted as a gigantic butterball turkey, the dodo is now thought to have been much slimmer, about twenty pounds lighter.
The idea of taking this new thinking and producing a slimmer dodo model came from conversations with Collections Manager Kristof Zyskowski of the Peabody’s Division of Vertebrate Zoology Ornithology section. Kristof introduced me to ornithology PhD candidate Michael Hanson. Michael is a very good artist and has spent much time reading, researching, and thinking about this bird. He showed me his illustration of what he thinks the dodo may have looked like.


Michael pointed me to some historical illustration from which to refer. He is not alone in thinking that the painting by Ustad Mansur is a good reference. The dodo is shown among other birds depicted so accurately that the other bird species can be identified from the painting. Therefore, the dodo is assumed to be shown with accurate colors and form. I was guided to defer to this painting to color the dodo’s beak, face, and body. Michael adds that the details of the Mughal painting fit with early written descriptions by Jacob Cornelisoon van Neck (1601) and Carolus Clusius (1605). Clusius mentions the blue spot on the lower bill near the yellow and black tip, and Sir Thomas Herbert (1634) also mentions that the bill has a yellow tip and likens the eyes to diamonds.

Laerle’s illustration was made from direct observation of living and dead specimens. We used it to sculpt the head, the dodo’s weird “hood”, and the beak’s fleshy connection to the head. These sketches and the two paintings also give a sense for the dodo, though still large and bulky, was a more slender, “leggier” bird than traditionally depicted. This fits with the skeletal data.

According to Michael, the rhea is the closest living bird whose feathers most closely match the look of the bird in Hoefnagel’s painting. When I had trouble finding a rhea, I asked whether I could expand my search to include an emu or ostrich. He thought about it and replied that ostrich feathers would have been too large and broad, emu feathers far too narrow and ‘hairy’ looking. So actually, the rhea was the only bird that would do! As luck would have it, I asked a taxidermist friend what he would do to find a rhea skin. It turns out he had made a taxidermy mount of a rhea several years previously. He got it from a safari park in Pennsylvania. I made a call to the safari park and they had a juvenile rhea that wasn’t developing properly. They were days away from culling it from their flock, so I jumped into my car and spent the day driving to Pennsylvania, skinning the euthanized bird, and driving home with the feathered pelt.

These casts of the Oxford head and foot are the only soft tissue references in existence. As can be seen, they are clearly not lifelike. Still, we often referred to them to get the right placement of details such as the nostril and ears. The casts picked up the nubs left by the feathers, which indicated location of feathers on the hood and parts of the face. The foot was somewhat problematic because, from my experience skinning birds, the toes of the cast are much fatter than what I believe the smallish bones from our scanned skeleton would support. It was determined later that the plaster cast foot is of a male (our skeleton is a female) There is a significant size difference between the sexes. This is seen in the foot. The cast still gave me a good idea about the size and patterns of scales on the legs and toes.

And then there are the close, living relatives of the dodo, like the Nicobar pigeon. Michael thought the colors of the young Nicobar Pigeon might be a good reference for the dodo’s facial coloration.
Getting Started:
In January 2019 Kristof asked Leon Claessens, an ornithologist who has studied the Durban dodo, for his 3D scan of the specimen. It took a while. He was in the middle of moving to the Netherlands to take a position at Maastricht University and COVID-19 challenges slowed the process further. After permission was granted from the Durban Museum, we received the 3D files in June 2020.
At this point I had a year to go to my retirement. The dodo was the highest profile model left for me to finish and the biggest challenge in forging new ground in my skill set. I had never made a feathered reconstruction. I hadn’t used a 3D print of a scanned bird’s bones with muscles added as an armature and, while I have seen other taxidermists use only one steel support rod to support an entire mount, I had never done one myself. All these new frontiers would later cause me trouble.
I had a list of other models and projects to finish before I retired. From June 2020 to January 2021 I repaired and resculpted the Peabody’s giant squid. I re-attached the head half with the tail half of a 16′ taxidermied gavial (a fish-eating crocodile) that was cut in two during its removal from the Great Hall in the early 1990’s. I finished enlarged models of a bee and an orchid. I produced a number of 500-million-year old Ediacaran biota models. Collin Moret, the Peabody’s exhibition media developer, and I took composite photographs of each of our dioramas to create 3D photogrammetry images.
I knew that if the dodo didn’t get a nudge sooner than later, I might not have time to finish it before I retired. Over Yale’s December 2020 holiday break, I looked at some of the poses that dinosaur sculptors are currently using to animate dino sculptures and I produced two “gestural” maquettes, one of a running bird and the other, a feeding dodo. I sent photos of them to Kristof and Kailen Rogers, Peabody’s associate director for exhibitions, for their comments. Kailen suggested that we use one of the poses for the fleshed-out model and the other for the skeleton.
Collin was the key person at Peabody to begin the digital work of changing the skeletal pose to a more active pose. Unfortunately, everyone was working at home because of Yale’s precautionary COVID protocol and Collin’s computers were at the Museum. So, the dodo work was stalled another six months. Work slowdowns were the order of the day, but I was able to do further preparation of the rhea skin and I attended a local farm auction in CT and bought three white roosters for the white underbelly feathers. There was plenty of other work to do. Approvals were needed from curators and exhibits administrators as well, so we waited.
Rick Prum, Peabody’s curator of Ornithology, broke the impasse. He weighed in on the poses and agreed that the active poses would be good for the exhibit. He suggested we contact Dr. Stephen Gatesy, professor of anatomy and paleontology at Brown University for advice on the correct placement of the limb bones.
I had worked with Dr. Gatesy 15 years ago to create the Torosaurus sculpture now in front of the Museum. I was impressed by the rigor of his research into animal and especially reptile, locomotion and the confidence he gave us as to the anatomical accuracy of our dinosaur’s pose. I re-introduced myself to Dr. Gatesy and asked if he would help us with the placement of the Dodo limbs. He graciously agreed to help us. We sent him the 3D scans and, in a couple of weeks, he sent back his revisions of Collin’s earlier poses. We knew that the skeletal model was now accurate.

I had overseen Collin’s first, successful attempt at sculpting muscles on the bones of the original Peabody dodo skeleton. Since he had already done it, I suggested he repeat the process on the running skeletal model. With less oversight, but with some pushing, pulling and smoothing, we got the muscles digitally inserted onto the skeleton. Collin then engaged Shapeways, a full-service 3D-printing company, to print our model. By late April, 2021, the printed model was delivered. I glued the pieces together with the plan to use this as the armature for the feathered model.

Life got weird at this point. Retirement was a couple of months away, but after negotiating to rent our house for two months beyond the end of our lease, the landlady changed her mind and wanted us to be out by the end of May. There was no way to rent someplace for two months in Connecticut, so we moved earlier than expected to our family farm in western New York State. I cleaned a 600 square foot barn at our new home. I installed electricity and lights to use it as a new studio. I set up a table and a vise and moved the dodo to Western NY state.
I had planned to have only one hidden rod going through a single toe to hold up the entire model. What I didn’t realize was how heavy the 3D printed model was. It made the single rod idea impossible. I still wanted to use the single support rod idea, so I decided to make a rubber mold of the 3D print for a replica in lightweight foam. Then I could discard the heavy plastic body. But I kept the plastic legs, because the plastic was quite strong and the support was firmer with the steel rod inserted through them.

Sculpting, molding, and casting the legs, feet and head had to take place before the final step-putting the feathered cape over the body. I used wax to produce a the smooth surface for the beak and I added clay onto the skull to create a first draft of the face.

I started the legs and feet at the same time. The toes were sculpted (as indicated by the bones) as less bulky and more feminine than in the plaster cast of the London specimen. I deferred to those plaster plaster casts for the scale patterns.

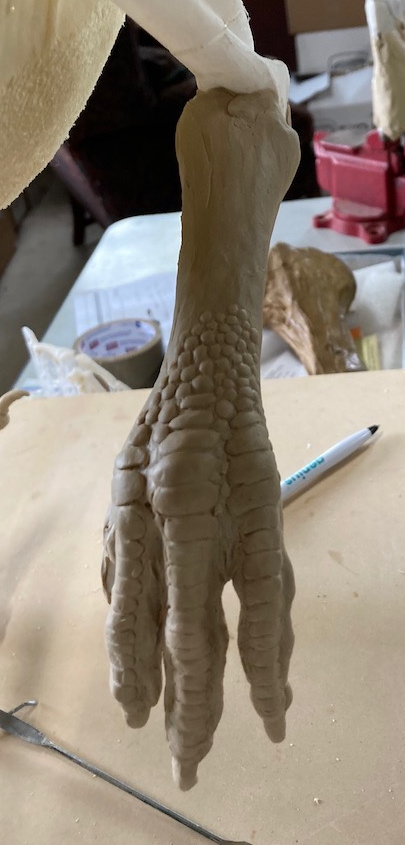
The small scales were made with balls of clay pressed onto the leg. The scales were finished by putting lightweight plastic sheeting over them and smoothing around each with a small dental tool. This was the same technique I used on the (much larger) scales of the Torosaurus. Once the legs were covered with scales, I made a silicone rubber mold. Casting was a bit more complicated. I first cast the larger scales in clear epoxy and then used a colored Elvax (hot melt glue) for the full leg. The process of casting Elvax is further complicated by having to heat the mold without burning or distorting the epoxy already cast into the mold and then squeezing the mold together over the threaded support rod while the Elvax was still hot!

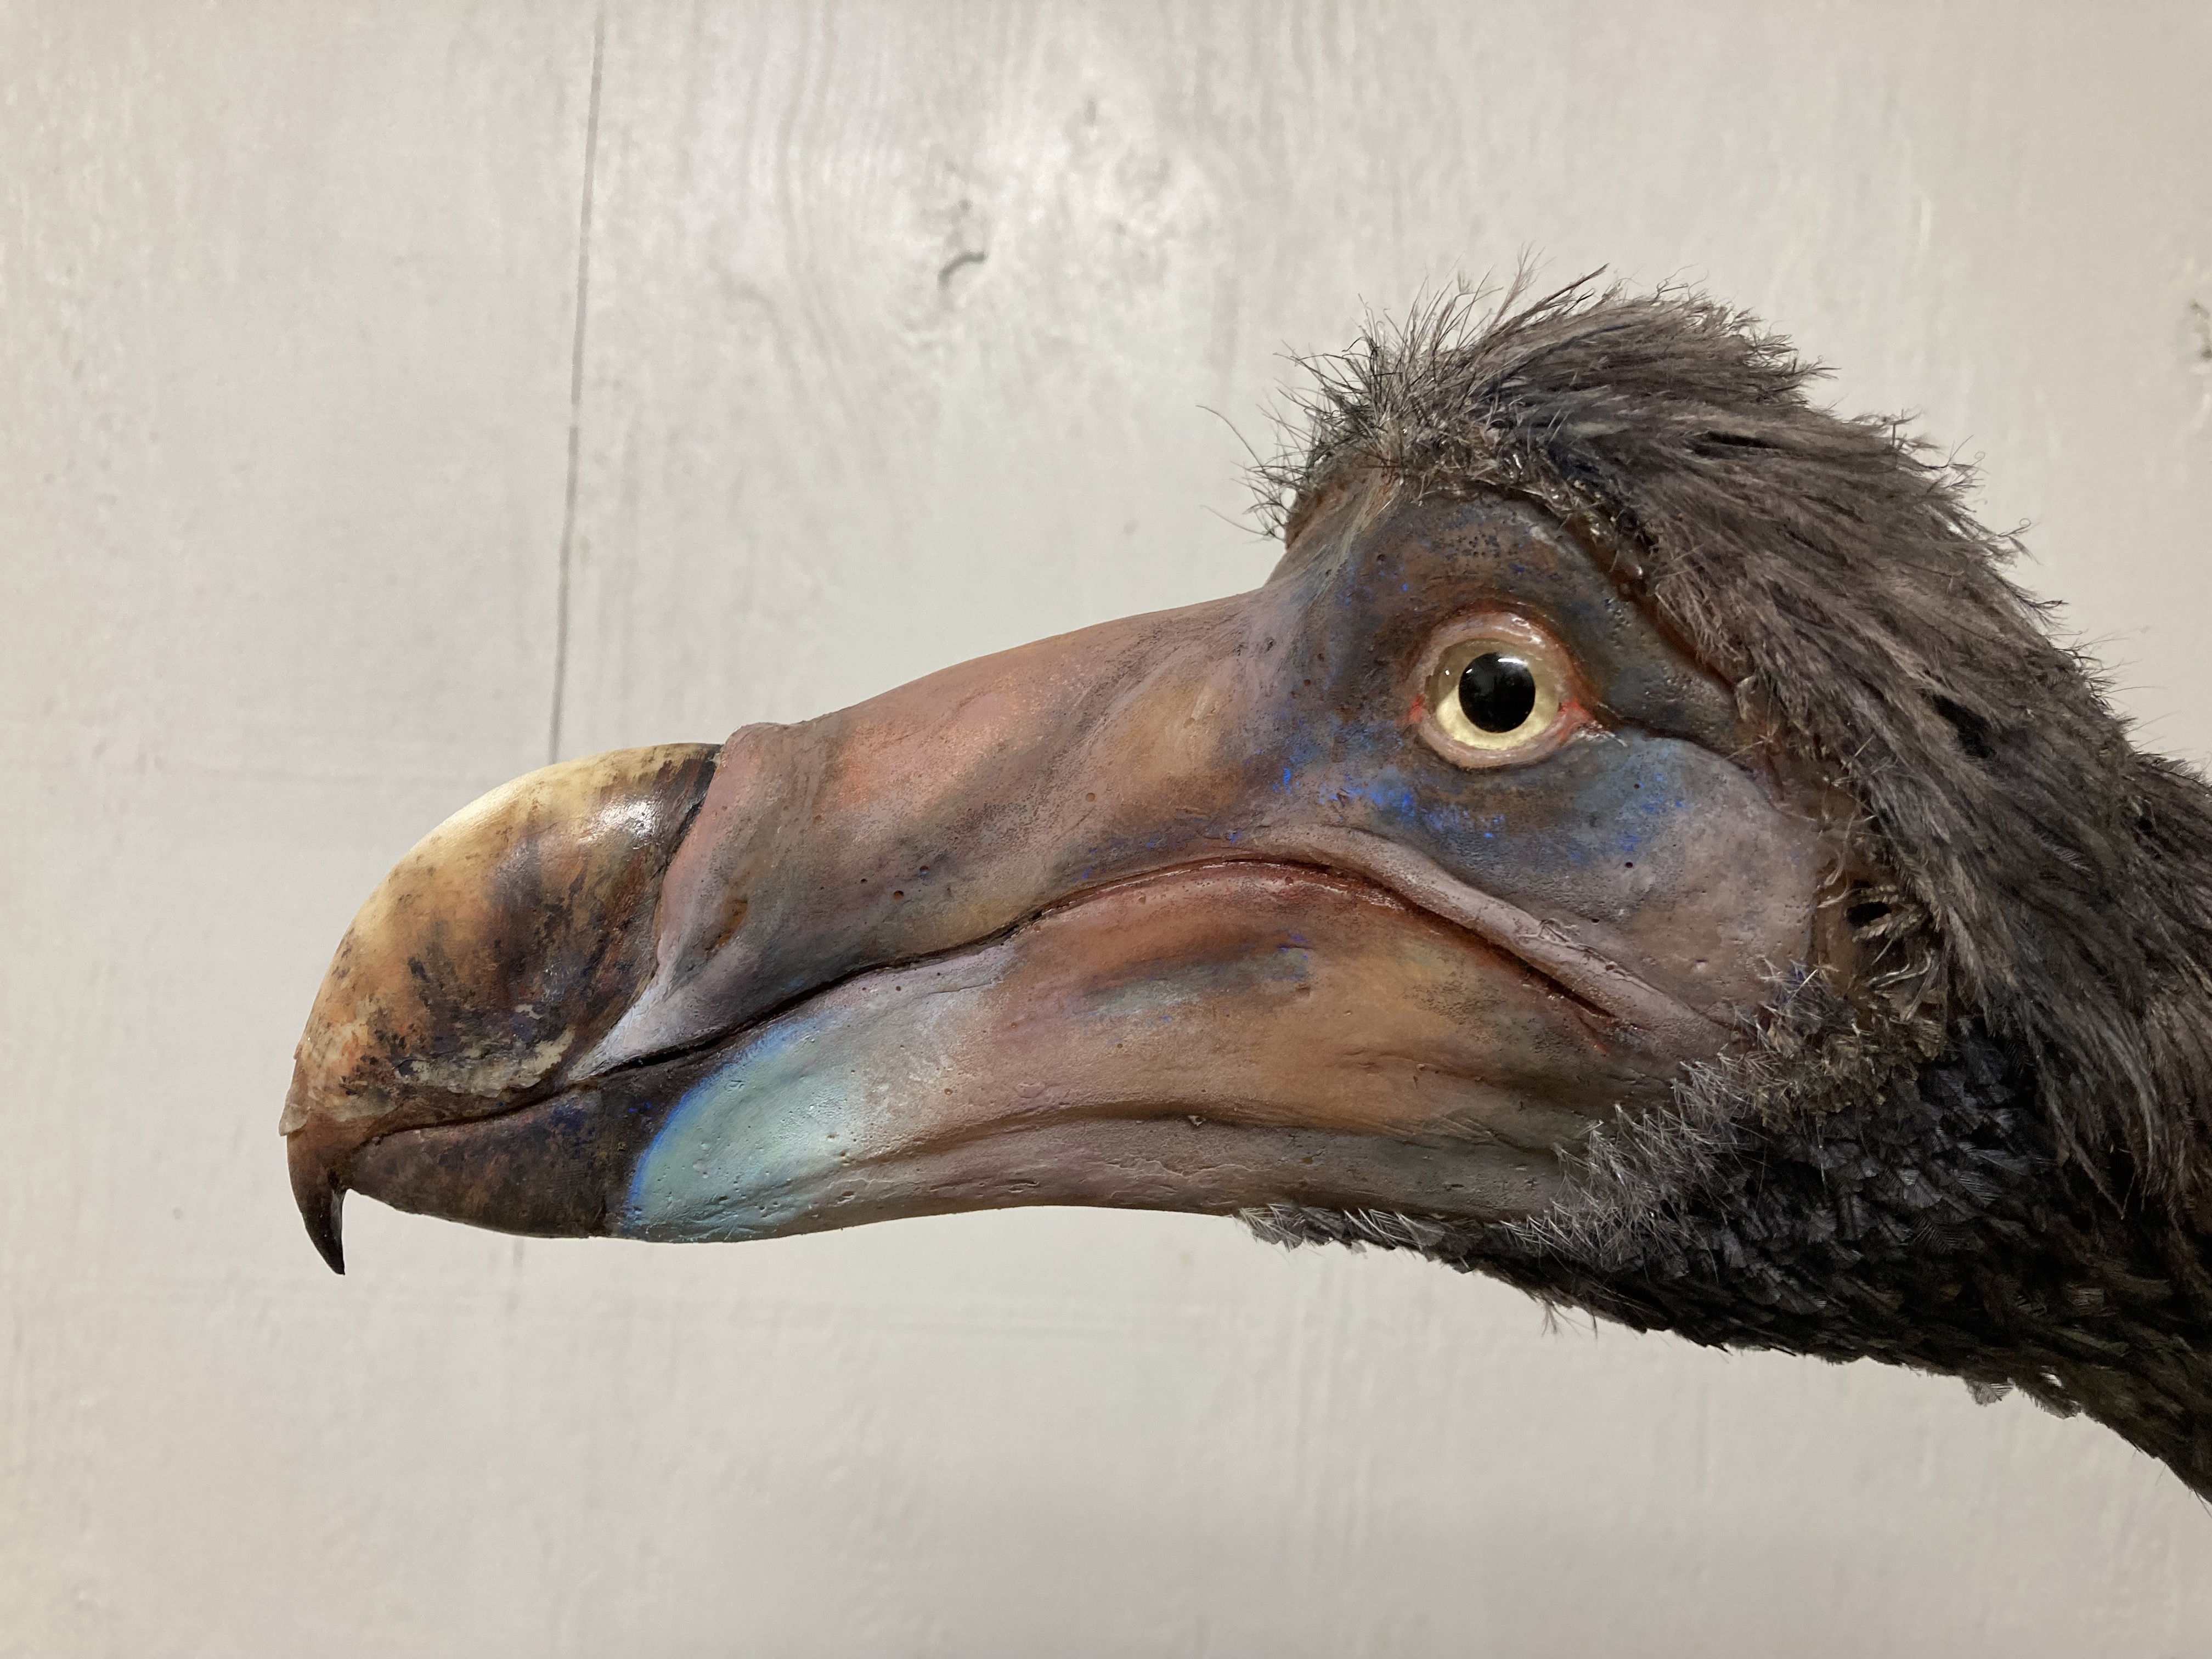
I sculpted the face more and asked Michael for his critique. What he wrote back took me by surprise. He said that the face didn’t look right. The facial proportions and the flat and bony top of the head didn’t fit the domed shape of the of known complete skulls, like the Oxford specimen. I wrote back that my reconstruction was closely based on the skull and that I didn’t take a lot of liberty with the clay. The skull strongly indicates the shape and contours of the soft tissue.
Then, more of a surprise, Michael wrote back and with a BIG apology that he had overlooked that the skull of the Durban skeleton had not been reconstructed with care. While the rest of this specimen’s skeleton was remarkably complete, it had only parts of the upper and lower jaws. The rest of it (and most importantly, the braincase) had been very roughly sculpted in plaster, and didn’t resemble any known complete dodo skulls. He asked how I would feel about substituting another skull for the Durban skull. I told him that I could roll with it.
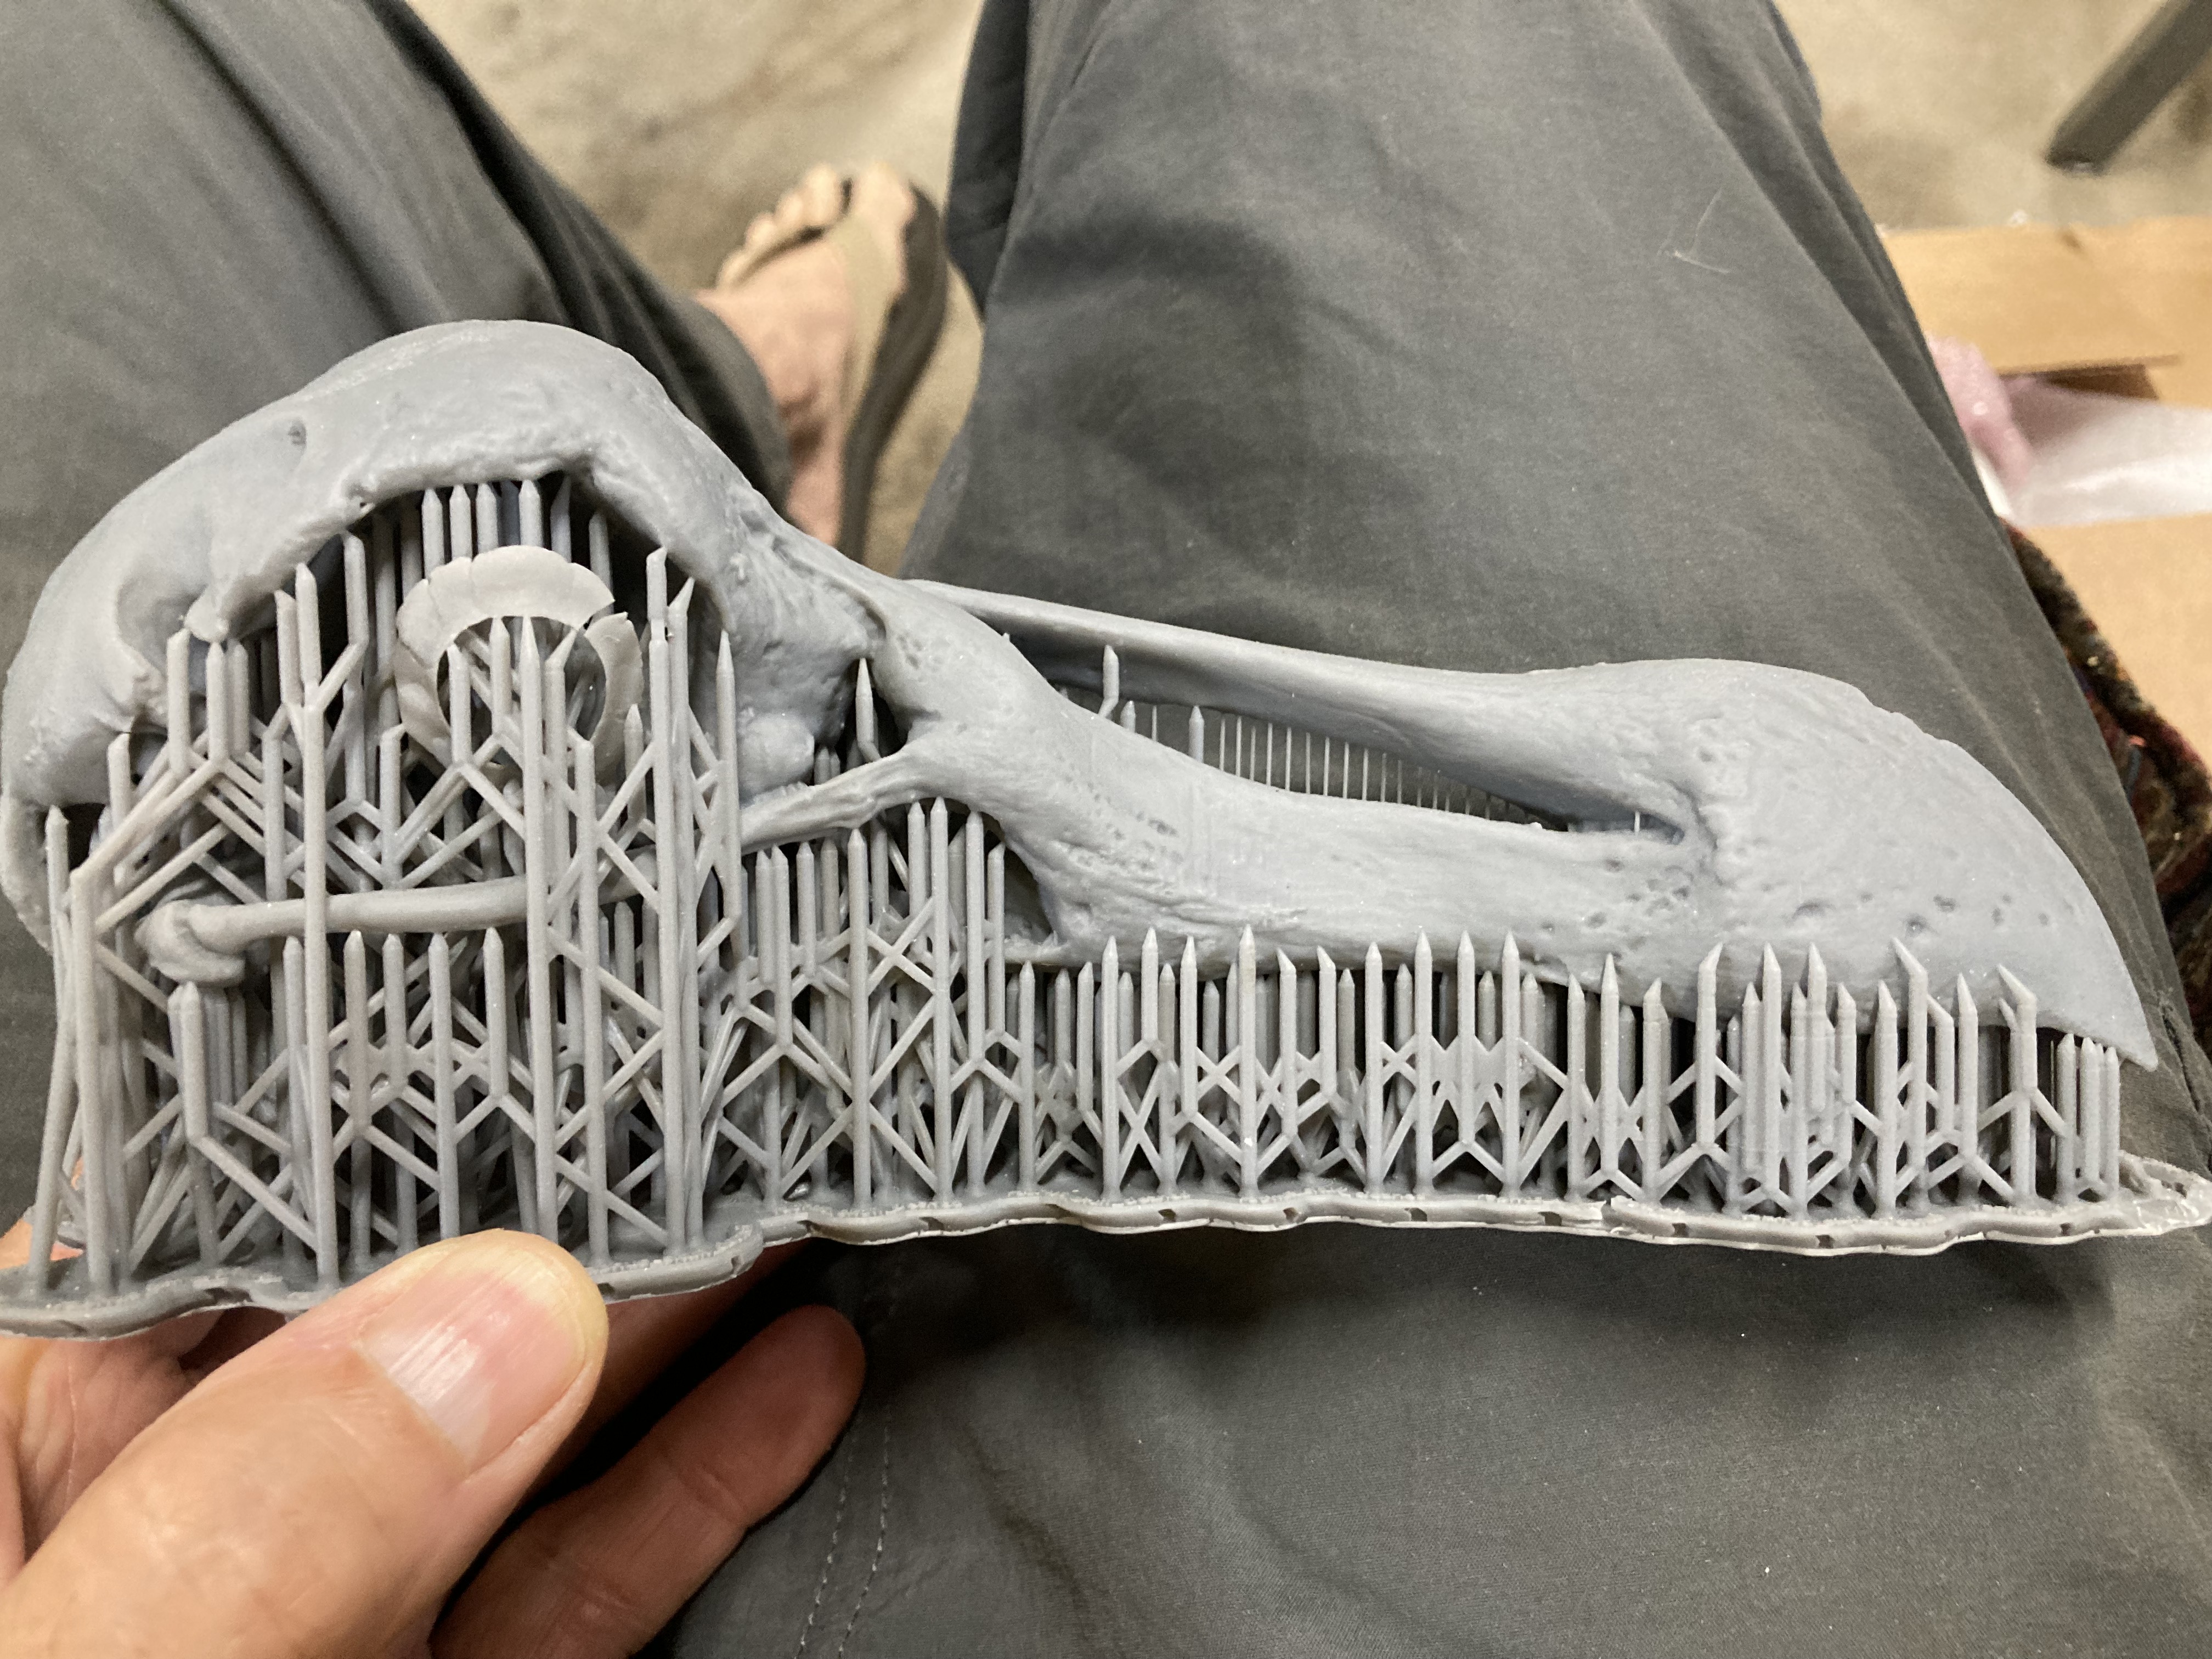
The Oxford skull was close in size to the Durban skull, so this made it an appropriate choice. Michael knew of a CT scan of the Oxford skull freely available for non-commercial use. He segmented the skull elements from the scan data and digitally converted these regions to 3D mesh files. These extracted raw meshes were then cleaned up with 3D modeling software with a minor reconstruction of one of the quadrate bones that was broken. To complete the skull, a new scleral ring for the left eye was added by flipping this element from the opposite side. The cleaned meshes were then merged together into a single file of the complete skull and mandible that could be sent to Collin to be 3D printed. I was astonished that within ten days, I had an accurate, high-resolution print of the skull and mandible with every bone of the skull, fully reconstructed.
Again, the 3D print was too heavy to use. I had to make another mold and pour a foam cast. Within two weeks, I had another draft of the face. I sent Michael photographs and, while he was much happier with the overall look, he wanted several more changes. Some of these changes I could confidently do by myself, others called for a one-on-one meeting together with the model in front of us. I spontaneously put the dodo, clay face and all, into the car and drove to New Haven.
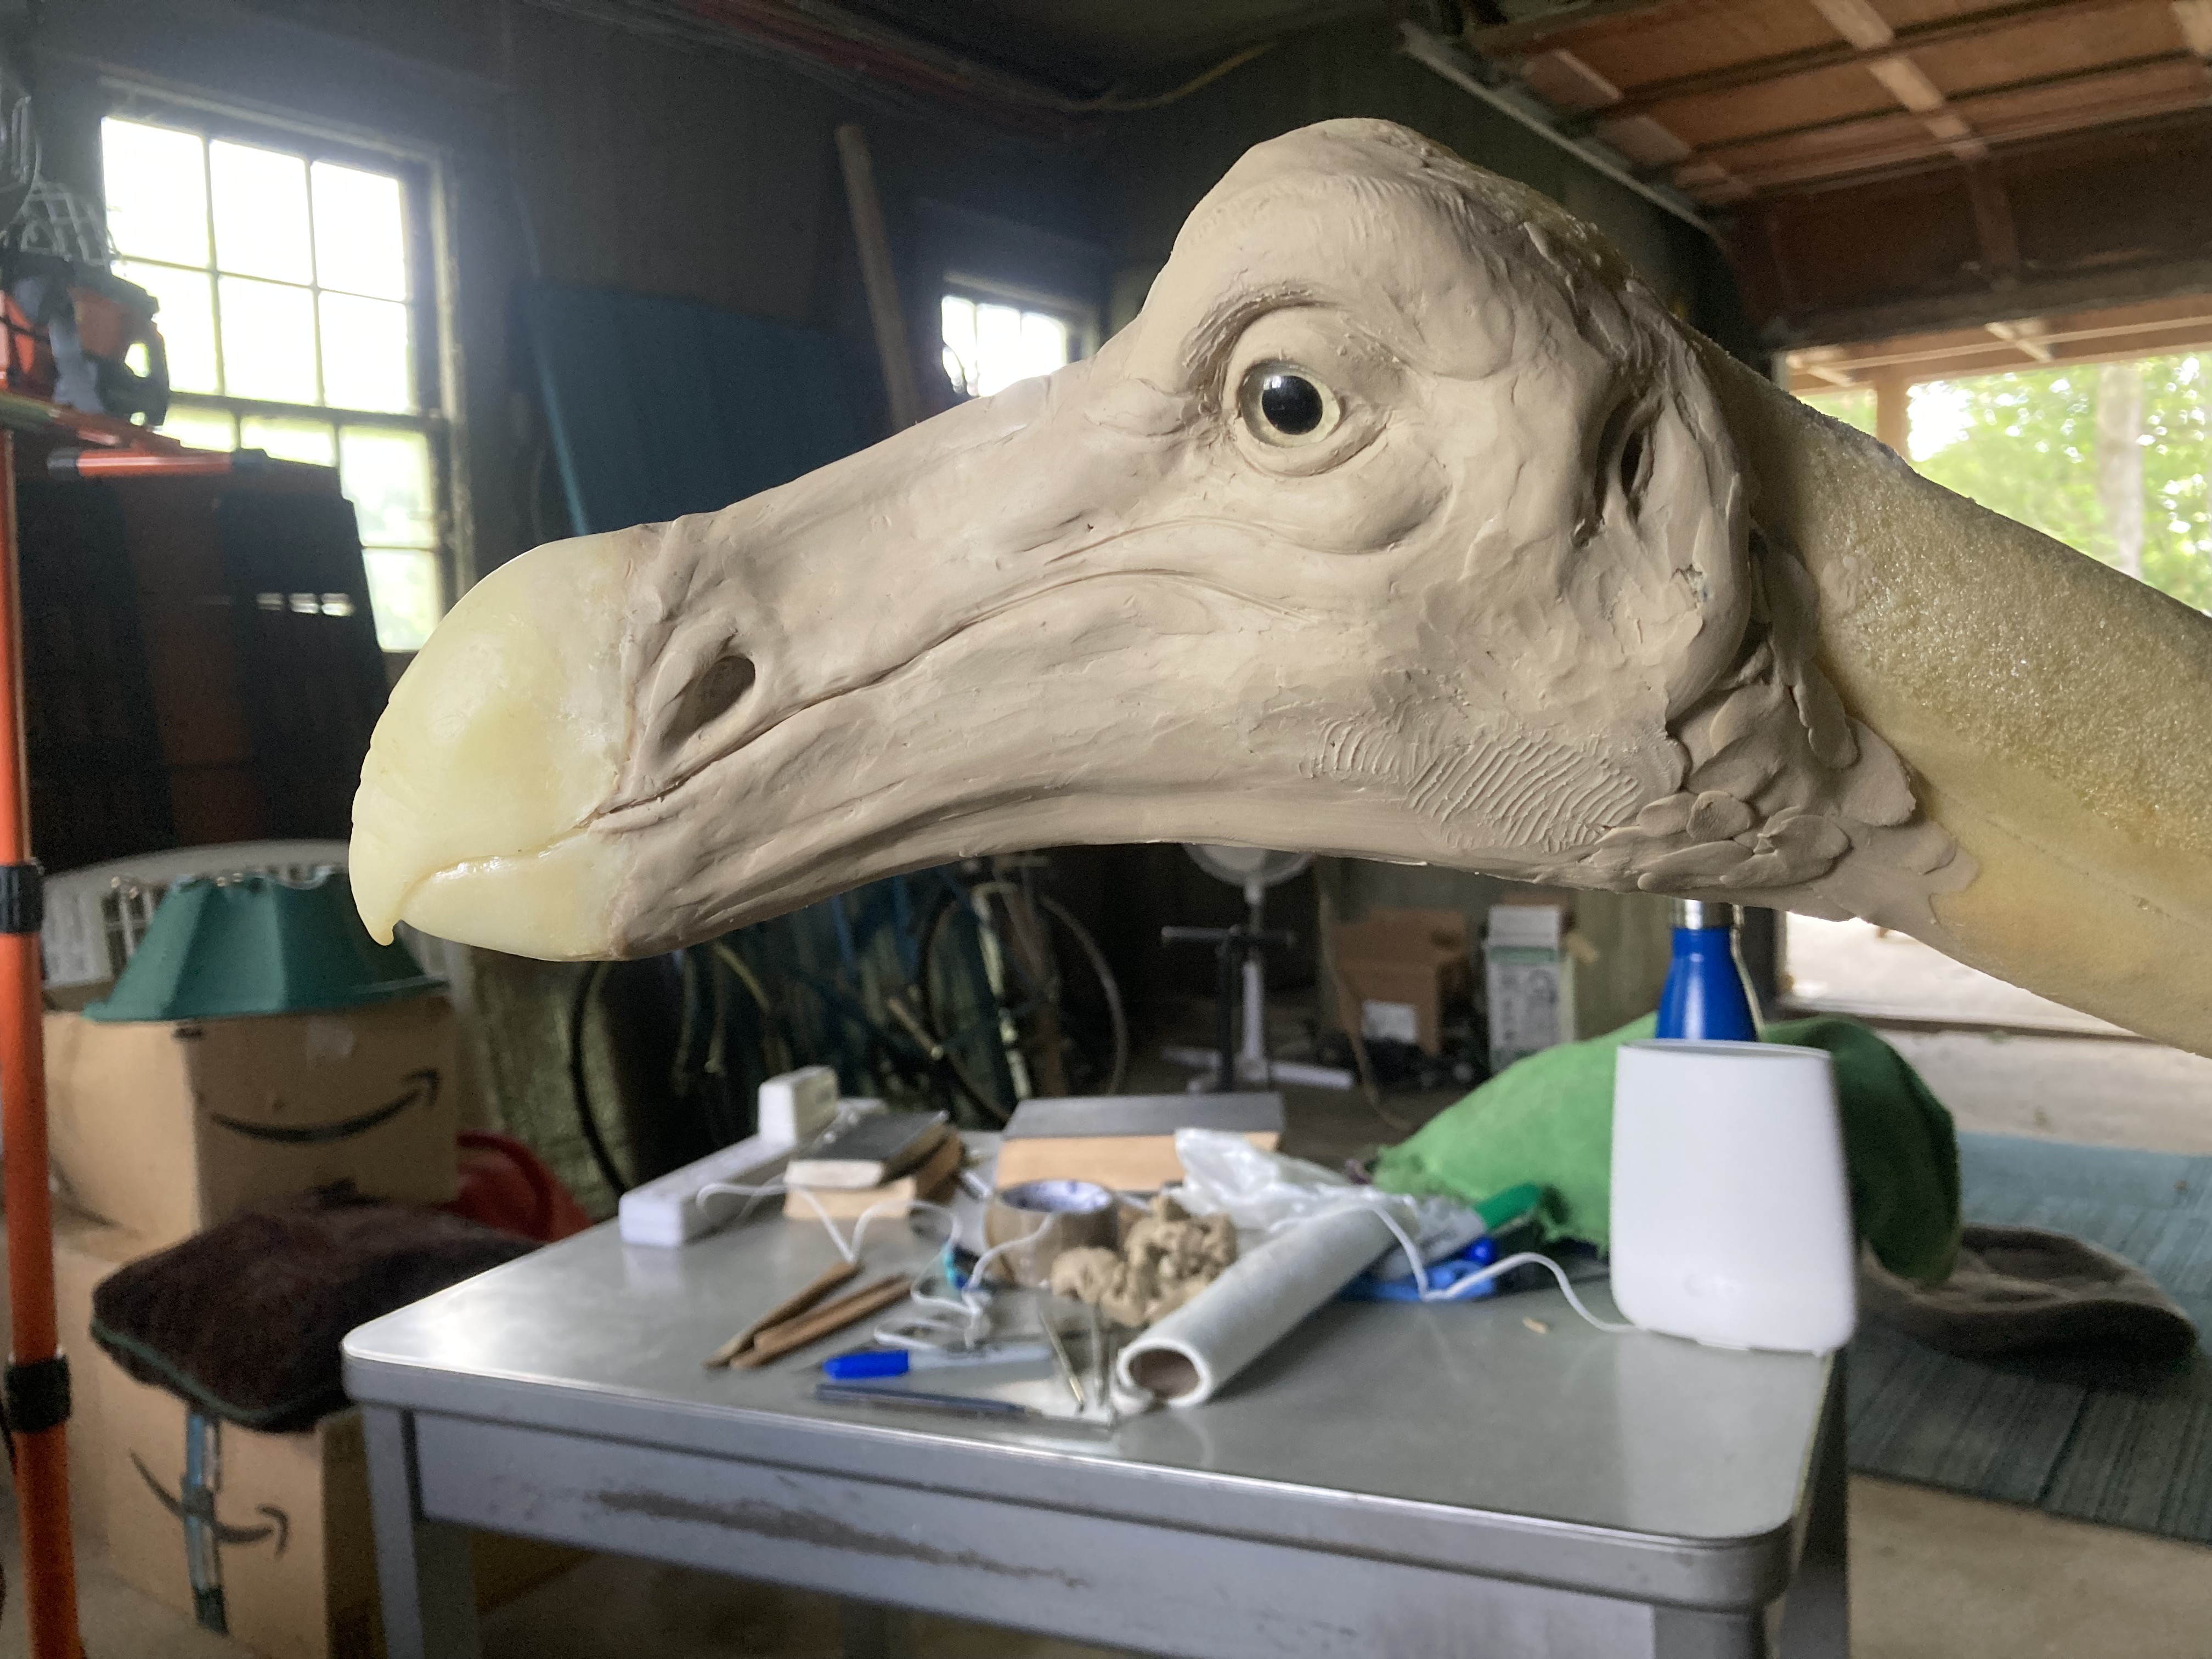
One of the changes had to do with the “hooded” skin over the forehead. I had never seen other extant birds with that kind of skin fold. I assumed it was an artifact of the skin drying after death. With that assumption, I had thinned down the hood. Michael showed me several 17th-century painted and drawn references of living and recently dead dodos that had prominent hoods and he thought clay should be added to make it thicker.
The second change had to do with the placement of the eyes. I had sculpted the alignment of the eyes like what is seen in hawks. The bony area of the skull over the eyes reminded me of a hawk skull. I tried to make the dodo eyes look more alert to conteract its historical “dumb dodo” appearance. Michael would have none of it. He wanted eyes more like pigeons than hawks. Hawks and other raptors have eyes that are more forward-facing than in other birds. They can focus on their prey with binocular vision. Pigeons have eyes that are more side-facing position and so have poorer binocular vision, according to Michael. Hawks and falcons also have large bony ridges above their eyes to block the sun’s glare, that gives them a stern look. These are absent in pigeons and the area around their eyes is much flatter.

Michael is a talented artist. At this point, I asked him if he wanted to take over and sculpt the face to his liking. He spent the next couple of hours doing just that! I must say, this was the first time ever for me to have a researcher doing the actual sculpting. It was good for me to see how my biases can sneak into my sculpting. I had to let go of the idea that I could manipulate how the public might interpret the model and let science, references-and the researcher!-lead the way.
I had ordered two sets of glass eyes, one with tiny pupils and the other with larger pupils. In some of the 17th-century references, particularly the Mansur painting, the eyes were painted with small pupils. This made the white of the eyes more pronounced. I pointed out that the white eyes also gave the bird a more vacant look, a “dumber” look. Michael struggled with this decision, but agreed to use the eyes with bigger pupils because pupil size is dependent on lighting, either one could work.

Now, knowing the clay face was how Michael wanted, I made a rubber mold and cast the face in Elvax. The first beak had to be sanded smooth of any texture and remolded. I would add the flakiness to the edges of the beak later.

The legs were painted extrinsically, as was the face. The feathers would have to be colored as well after they were added to the model. I, therefore, wanted the soft tissue to resemble the final condition as much as possible, to show how much color the feathers would need when seen together with the legs.

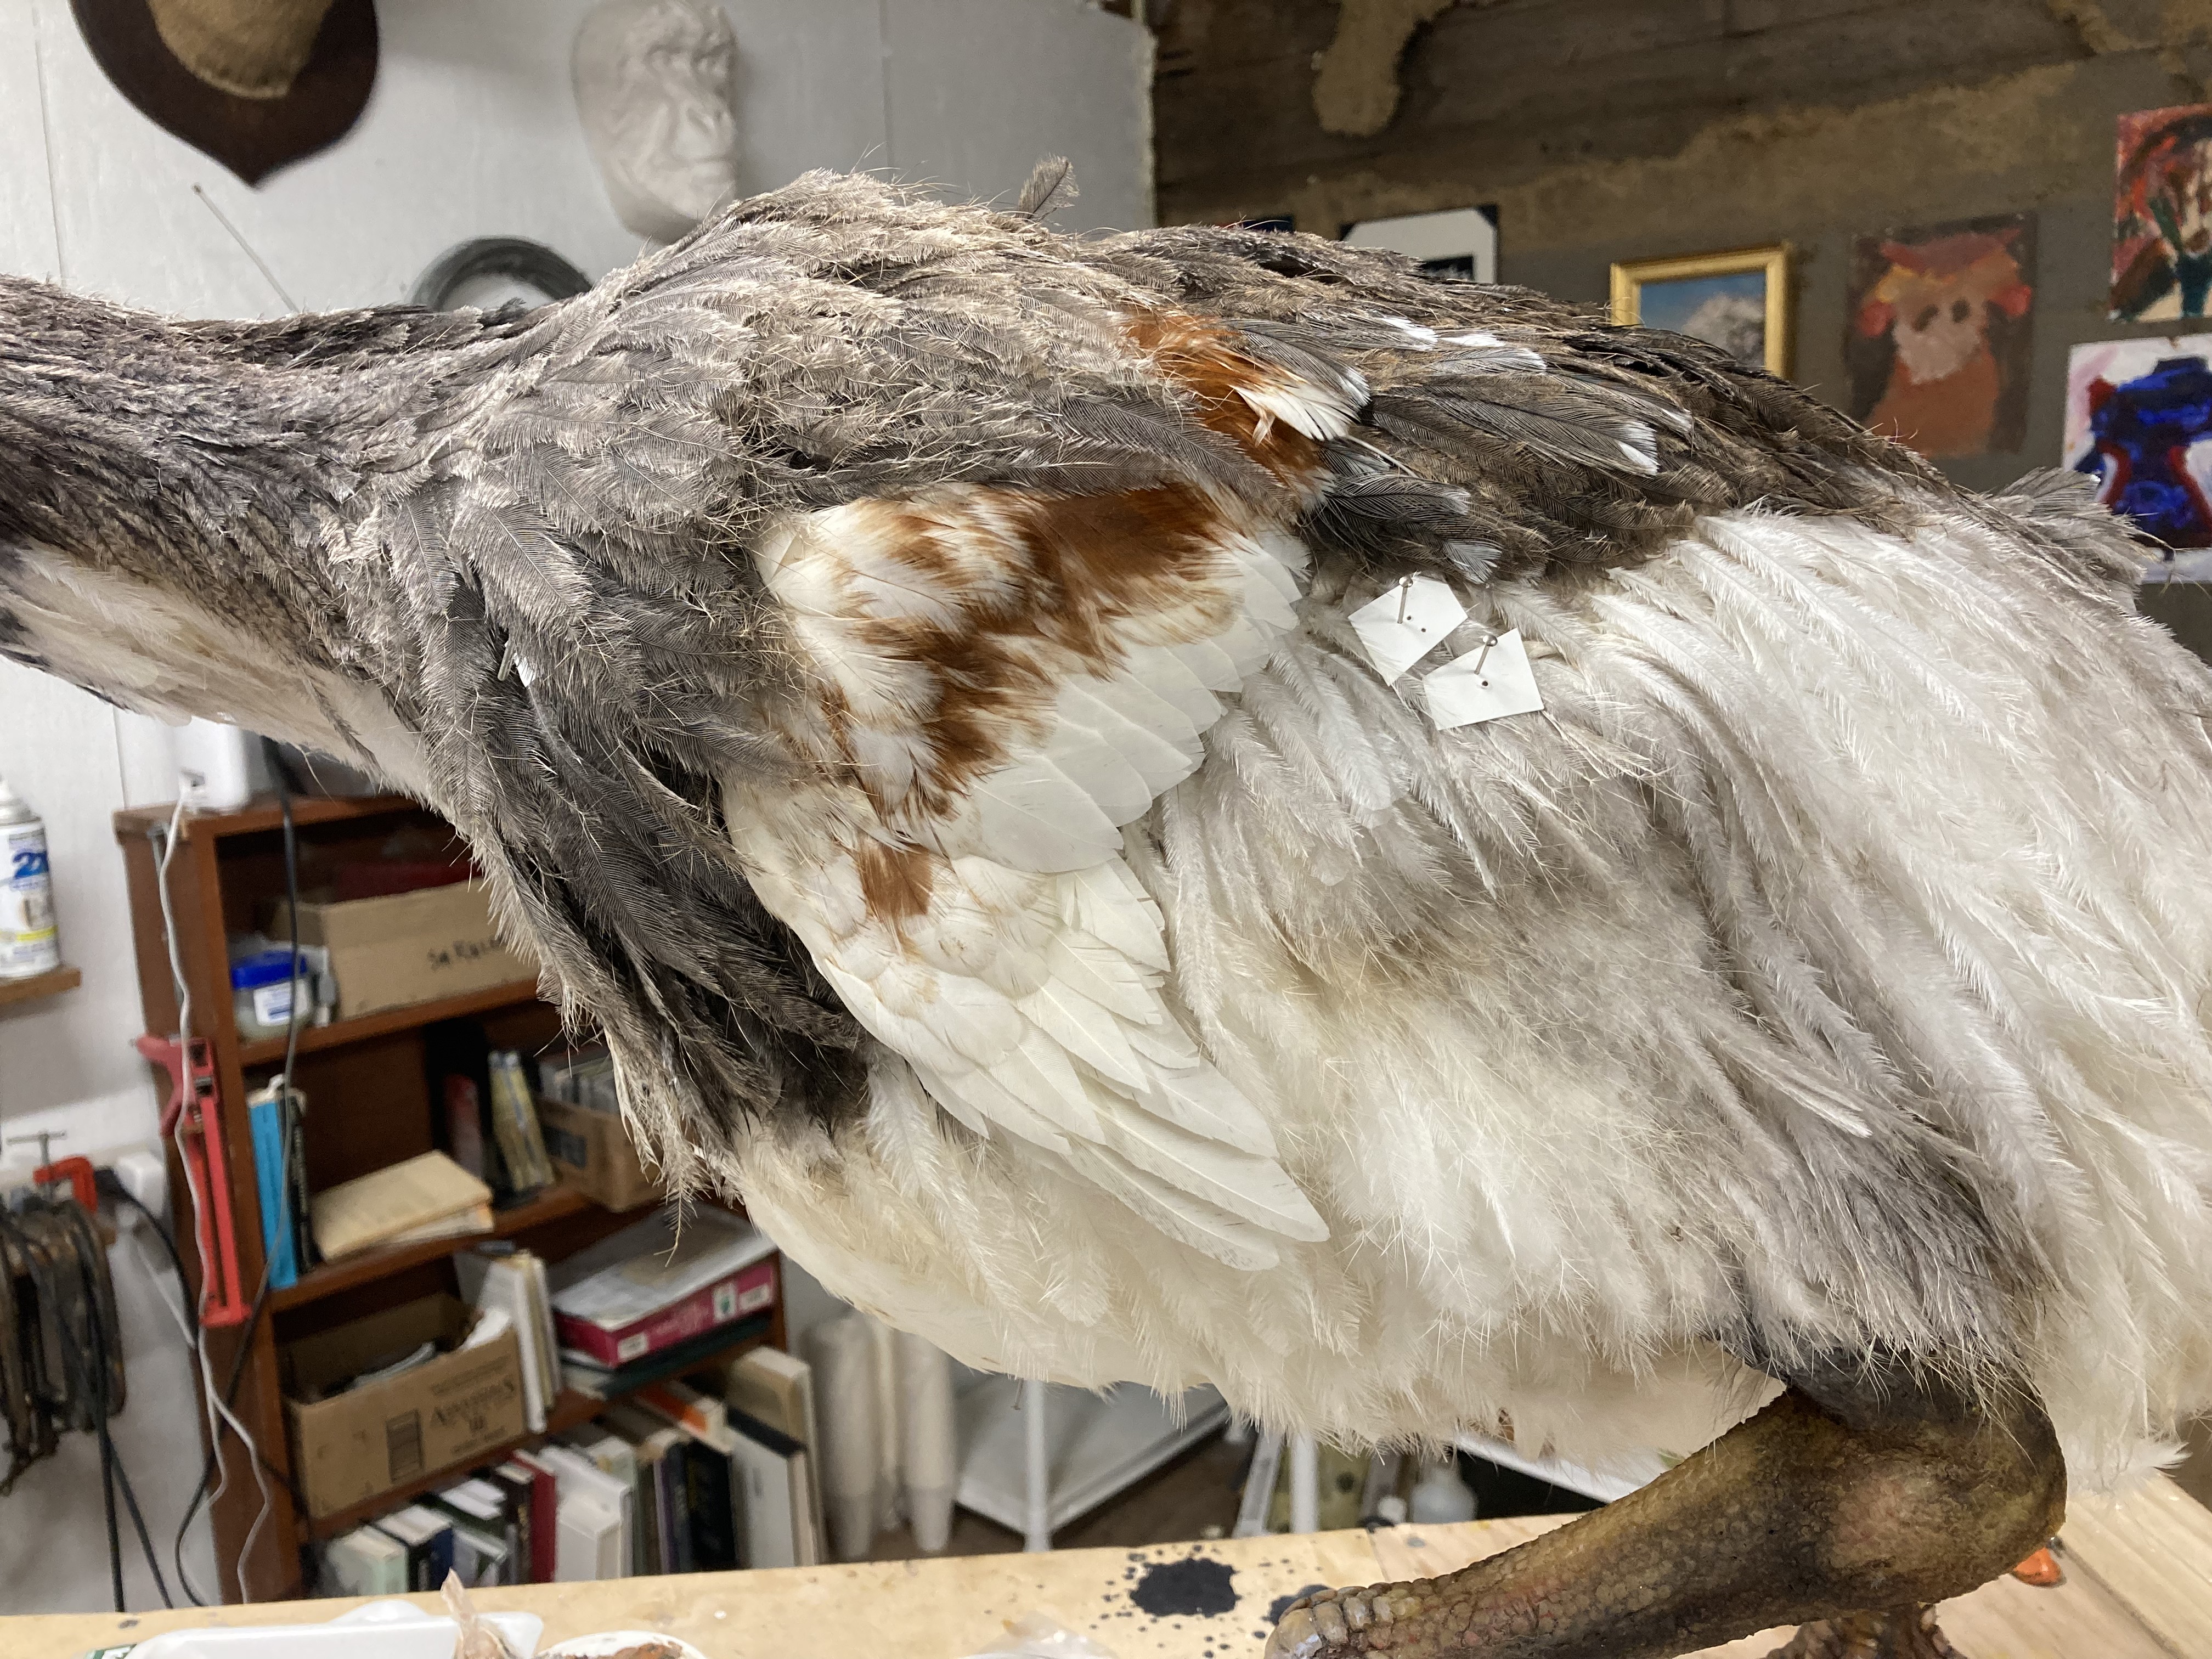
I was now ready to put the rhea skin on to the armature-almost! The rhea skin proved to be more of a challenge than I expected. I had tried the skin on the body previously and I discovered that it didn’t seem to want to dry. I had mentioned this oddity to Kristof, Peabody’s Ornithology collection manager. He wondered whether the non-porosity of the foam body might be retarding drying. I also checked whether I had been careful enough to remove all of the fat from the skin. On most birds, the fat lays on the surface of the skin when it is removed from the body. It is a simple matter to scrape it away. On the rhea, I found that there seemed to be a thin layer of fat captured under a layer of connective tissue. So, I scraped, but I mostly had to use a scalpel to break through the connective tissue to remove the pesky layer of fat. This extra preparation of the skin had its consequences; many of the pin feathers (there were a lot on this juvenile bird) fell out of the skin! These pin feathers would later have to be glued, one-by-one back into bald spots on the skin.
Another unexpected curve ball hapened that while I was gluing feathers onto the throat, I had the base propped up so that the beak was positioned skyward and I could better see the throat area. I thought it was secured solidly to the base, but with all the weight balanced on one point (the rod through the toe) it was quite unstable. It twisted over to one side before I could catch it and the face banged onto the table. I thought, Oh no, I broke the epoxy beak or cracked a glass eye. I was relieved to see everything was intact. The definition of insanity is doing the same thing and expecting different results. Within fifteen minutes it did the exact same thing happened and banged the face a second time. Again, I was lucky. There appeared to be no damage. I needed to finish the feathering under the throat, so I unbolted it, removed it from the base, and put it into a vise so it wouldn’t rotate. Smart move for a dodo!!!
When the feathering was finished, I removed it from the vise and bolted it back into the base. That’s when I noticed that something had indeed happened. No matter how much I tightened it down, it still wobbled as if it were loose. I surmised I had banged it hard enough to loosen the rod internally from the foam body. This was a terrible moment because it meant I either had to remove the skin and feathers, hog out a significant portion of the foam body around the rod, re-secure the rod, pour more foam around it, re-sculpt the body-basically, it meant starting from scratch.
Kailen told me that if needed, a second rod emerging from the non-show side wouldn’t be that obvious. So, rather than start over, I drilled a three-quarter-inch hole into the body on that side and hit the other rod that I thought had loosened. It didn’t budge. I embedded a threaded coupling nut inside the body which allowed me to run another threaded support rod into it. Now I had a rod in the foot and another in the back.

Then, just when I thought it was smooth sailing, things got worse and then seriously gross! Flies were attracted to the skin. I used the fly swatter around the studio, but I now live in farm country and the vacuum of less flies fills quickly with more flies! We had a couple of weeks of wet humid weather and the skin didn’t dry as rapidly as I expected. Since I had gone over the skin carefully, I figured that eventually, it would take care of itself and I continued to color the feathers and add the fine facial feathers under the jaw and up around the head. Then, a maggot dropped out of the feathers! And then another…I rapped on the model and out dropped a collection of five or six more.
I contacted Ray Pupedis,the Entomology collection manager, and he suggested I get the model into a freezer. The only freezer I know that gets cold enough to kill pests is at the Peabody Museum. So I loaded the dodo into my car again and made an impromptu trip to the Peabody Museum.
The silver lining was that I had another in-person critique with Michael Hanson after the model had spent five days in the freezer. We reviewed both the facial and feather coloration. He and I got down to specifics of how the wings should look. He produced a beautiful scientific illustration of a dodo wing that I could use to measure and shape each of the feathers. Michael’s drawings are based on the wing skeleton and 17th Century drawings and descriptions of the small, pointed wings with four prominent primary feathers. Even so, it’s still conjectural.

Michael Hanson’s Dodo wing drawings 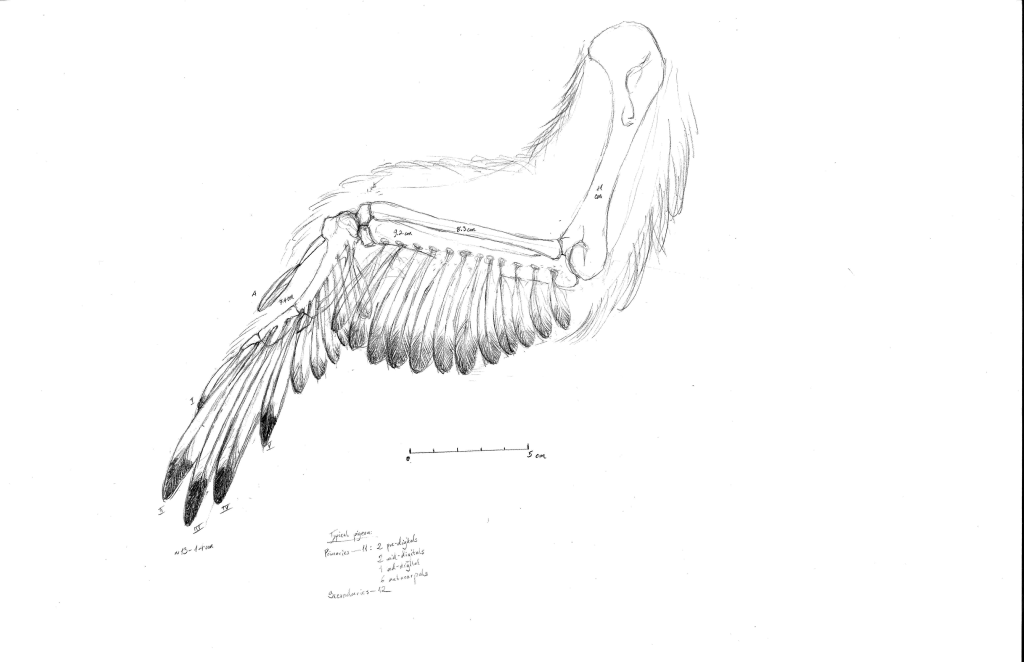
I also met with Kailen to show her the new support rod I had put in. She told me that the rod would actually be visible. A post would be needed to hold the rod , which the public would also see. Visible supports behind the model didn’t sit well with me. If I had to use the second support rod, I would, but first I wanted to revisit the single support rod again and see if I could make it work.
When I had hit the internal portion of the rod with the drill, it didn’t budge. This made me think that the problem wasn’t internal, but was located where the rod bolted into the wooden base. This proved to be true. I drilled a 5/16 inch hole through a block of steel and bolted the rod into that, and secured the steel into the wooden base. The single rod held the model securely. I backed out the second rod and covered the coupling nut with the feathers. It is still available to be used if the single rod fails at some point.
I only had a couple of things to finish up. I added the final tiny feathers around the face to soften the edges of the feathers as they transition to the face. These feathers were cut to the 2-3 mm range and all of them had to be glued and put in place with forceps.

After I formally retired, I negotiated for four more months to wrap up this project. I thought this was more than double the amount of time I needed to finish. As it turned out, I needed every one of those four months.
My work usually involves making things up as I go along. I never know exactly what I need to do to get where I want to go. This is something that I both love and gives me heartburn. When working on a model, some things go forward without a hitch and it seems everything I try works out. Other times I run into curveball after curveball, which is what happened with the dodo model. I can never predict how it will go, but when I have a “curveball” project, it can be fun (sometimes better seen in hindsight) to try out plan B or plan C or plan X because it is always creative and I always learn more about my subject, expand my toolkit of materials, and meet others who can guide me along my goofy path.
I end this post with a thank you to the Yale Peabody Museum for a great career and for the cool, interesting people that I have worked with.
