

An actual pinned specimen from the Peabody Collection (approx 6 cm wingspan)
I started working on this model in late September, 2019. This was when the model was approved for inclusion in the new museum. The intention is to show the adaptation that has developed between the Golden Columbine flower and the hawkmoth. The flowers have long spurs descending from each petal that contain nectar, but only the hawkmoth has a long enough proboscis to reach down to get to it. While feeding, the moth picks up pollen and pollinates other flowers it visits while feeding. I produced a scale model in cardboard to compose the relation of the moth to the flower. I made the moth and flower as large as I could in the limited space of the case. The enlarged hawkmoth’s wingspan is about 25″. The cardboard model was also used to critique and to approve the design by the entomologist and the botanist.

Enter a caption
The flower was started first. I cast the five petals by embedding a yellow colored light gel between two layers of tinted 5 minute epoxy, which produced a luminous yellow petal. Using epoxy also gives me some flexibility to form the petals later by applying heat.

I used clothespins to hold the sepals to the petals before I adhered them together
I started the enlarged moth model by measuring as much of the actual specimen as I could. I roughed out the head, thorax and abdomen to scale in bass wood. I did each body section separately and doweled them together. If I needed to add more to the wood in places, I used auto body filler. I then purchased a new toy: a static electric flocking tool from the model train scenery catalog. The method is to spread a coating of adhesive (white glue in my case) on a steel plate prepped first with vaseline on the surface. A ground wire is attached to the steel plate and flock is sprinkled from the electro-static tool onto the glue. The static electricity makes the flock stand straight up. When the glue dries, the flock can be peeled up in sheets. This turned out to be a perfect “skin” for making the furry look of the moth body. I was even able to lightly brush the flock at an angle as it dried to look more realistically like fur laying down in one direction over the body.

First abdominal segments with test strips of flock.
The wings were sculpted in clay, molded, and cast in clear epoxy. The wing patterns had to be painted on the epoxy casts because the colored flock wasn’t dense enough to carry the color. The flock was cut to fit between the veins and then glued down. The patterns were painted with thin oil paint directly onto the flock.

Painted epoxy wing before flock
I was hoping that I could hold the moth from a single point at the tip of the right wing. In our dioramas, several of our taxidermy birds are held up as if in flight using this method. I glued a wire under the bottom of the wing for this purpose. As it turned out, the weight of the model bent the wire when I installed it from one point. A 6″ long screw through the abdomen into the back wall will be used instead.

Finished wings

Wings inserted into the thorax (note one of the cast green eyes on the table)
I cast the eyes in slightly tinted epoxy. I bored out a hole in the middle and painted a dark brown to create a dark, but somewhat diffuse pupil. The rest of the thorax is covered with a longer “fur”, which I found in the faux fur section of a craft store. I cut sections, glued, and pinned them to the thorax and the head. The flanks were covered with fur that I cut from the backing and glued directly to the body. The faux fur, like the flock, accepts direct paint so I could reproduce the dark/light patterns. I also had to make each of the six legs. I did my best to measure each leg’s segments from the actual specimen. There are long, paired spikes on each leg at one of the joints. The spikes were made by sharpening brass rod on a belt sander. I secured the rod into the electric drill chuck and spun it at high speed while putting it up on an angle against the belt sander. This produced a sharply tapered end to the rod that I snipped off and applied to the leg joint.


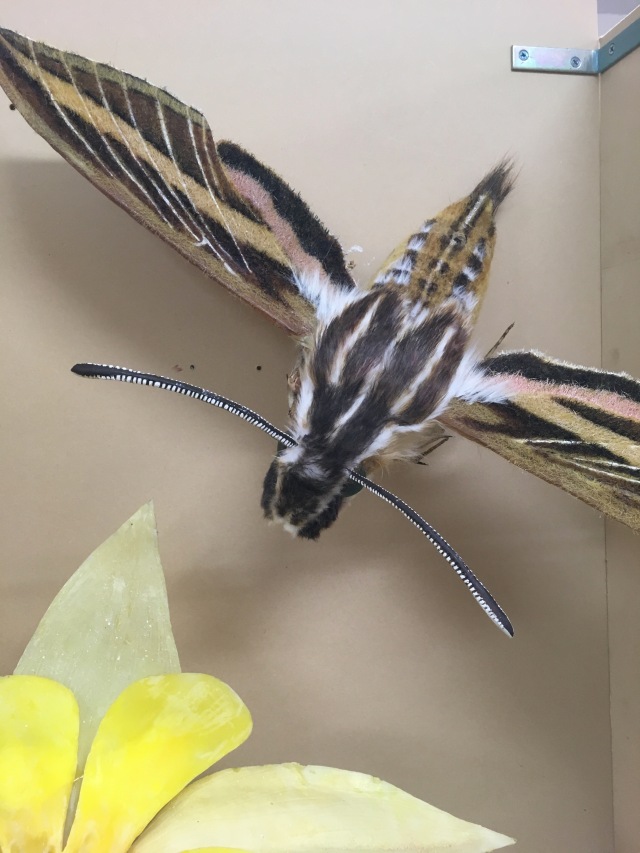
Details like the proboscus and antennae basically finished off the model. There will be more work to do on the flower to get the correct shininess to the petals and sepals. The stamens will be adhered into the center of the flower. All final adjustments will be done when I return to my shop after the COVID quarantine is over.

Gazowie. I am impressed, but always knew this was an elite group who could build models and pursue itty bitty details. Well done!